Making Color and Tonal Corrections >
Adjusting tonal range > Setting target colors for highlights, neutral grays, and shadows
|
Setting target colors for highlights, neutral grays, and shadows
In addition to setting the tonal range, you can use Levels to set target colors for the lightest and darkest areas of detail in the image, as well as areas of neutral gray.
When identifying the lightest and darkest areas of an image, it's important to identify representative highlights and shadows. Otherwise the tonal range may be expanded unnecessarily to include extreme pixel values that don't give the image detail. A highlight area must be a printable highlight, not specular white. Specular white has no detail, and so no ink is printed on the paper. For example, a spot of glare is specular white, not a printable highlight.
To set target colors for highlights, neutral grays, and shadows:
1 Select the eyedropper tool, and choose 3 by 3 Average from the Sample Size menu in the eyedropper tool options. This ensures a representative sample of an area rather than the value of a single screen pixel.
2 Choose View > Actual Pixels to make sure that you are viewing the image at 100%.
3 Open the Levels dialog box. (See Using the Levels dialog box.)
When you open Levels, the eyedropper tool (![]() ) is still active outside the dialog box. You still have access to the scroll controls and to the hand and zoom tools by using keyboard shortcuts.
) is still active outside the dialog box. You still have access to the scroll controls and to the hand and zoom tools by using keyboard shortcuts.
4 Identify areas of representative highlights, known grays, and shadows in the image. One way to do this is to move the pointer around the image, and look at the Info palette to find the lightest, neutral, and darkest areas. (See Using the Info palette.)
5 Double-click the Set White Point eyedropper tool (![]() ) in the Levels dialog box to display the Color Picker. Enter the color values you want to assign to the lightest area in the image, and click OK. Follow these guidelines:
) in the Levels dialog box to display the Color Picker. Enter the color values you want to assign to the lightest area in the image, and click OK. Follow these guidelines:
6 In the image, click the highlight you identified in step 4. If you accidentally click the wrong highlight, hold down Alt (Windows) or Option (Mac OS), and click Reset in the Levels dialog box.
The pixel values throughout the image are adjusted proportionately to the new highlight values. Any pixels lighter than the area you clicked become specular white. The Info palette shows the values both before and after the color adjustment.
7 Double-click the Set Gray Point eyedropper tool (![]() ) in the Levels dialog box to display the Color Picker. Enter the color values you want to assign to the neutral gray area in the image, and click OK. In general, assign equal red, green, and blue values to produce a neutral gray in an RGB image.
) in the Levels dialog box to display the Color Picker. Enter the color values you want to assign to the neutral gray area in the image, and click OK. In general, assign equal red, green, and blue values to produce a neutral gray in an RGB image.
8 In the image, click the neutral gray you identified in step 4.
9 Double-click the Set Black Point eyedropper tool (![]() ) in the Levels dialog box to open the Color Picker. Enter the values you want to assign to the darkest area in the image, and click OK. Follow these guidelines:
) in the Levels dialog box to open the Color Picker. Enter the values you want to assign to the darkest area in the image, and click OK. Follow these guidelines:
10 In the image, click the shadow you identified in step 4.
11 Click OK.
To use Threshold mode to identify the lightest and darkest areas in an image:
1 Do one of the following:
2 Click Preview in the Levels dialog box.
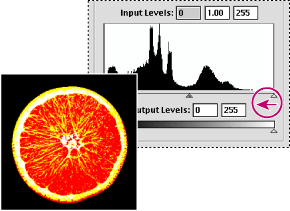
3 Hold down Alt (Windows) or Option (Mac OS), and drag the white or black Input Levels triangle.
The image changes to Threshold mode, and a high-contrast preview image appears. The visible areas of the image indicate the lightest parts of the image if you are dragging the white slider, and the darkest parts if you are dragging the black slider. If a color channel is selected in the Levels dialog box, the black area indicates where none of the given color component exists.

4 Slowly drag the slider to the center of the histogram to identify the light or dark areas in the image. Use these pixels for targeting the black point and white point in your image.
Making Color and Tonal Corrections > Adjusting tonal range > Setting target colors for highlights, neutral grays, and shadows